How to Prime and Paint Your Moulding
New to painting moulding, or just need a quick refresher?
Follow this guide for step-by-step instructions on:
- How to Prime Your Moulding for Painting
- How to Paint Your Moulding Before Install
- How to Paint Your Moulding After Install
- Helpful Tips
Getting Started
Whether priming or painting your moulding, you’ll need the following tools to get started:
- Paint or Primer
- Drop Cloths
- Rags
- Wood Putty, Caulk and Caulk Gun
- Brushes
- 220-Grit Sandpaper
- Vacuum
- Painters Tape (if painting after install)
How to Prime Your Moulding for Painting
Priming is an important step in painting your moulding. It ensures your moulding will have an even finish, brings out the color of your paint and prevents cracks and fading.
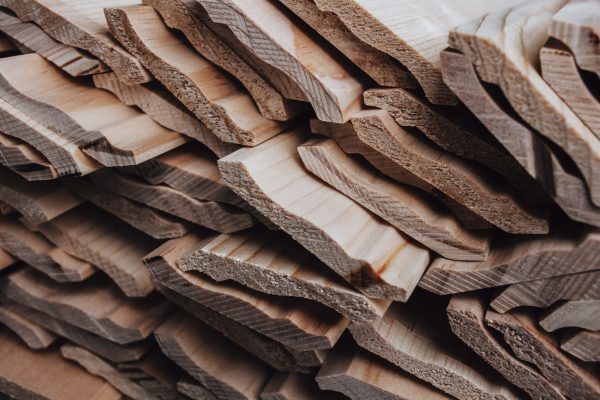
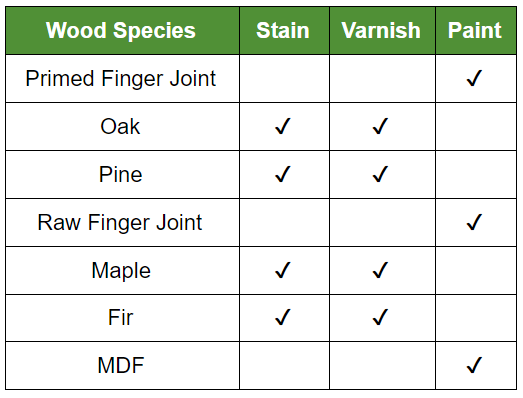
You can skip this section if your moulding is pre-primed, and most of the mouldings sold at retail stores actually come with a factory applied primer. It is only necessary to prime solid pine or unprimed finger joint moulding.
Step 1: Wipe down the moulding with a clean, slightly damp rag.
Step 2: Sand the moulding with a medium/fine grit sanding sponge or paper.
We recommend using 220-grit sandpaper.
Step 3: Vacuum the moulding.
This prevents dust and debris from sticking to your primer.
Step 4. Prime the moulding with a primer of your choice.
Refer to the instructions on your primer for how many coats you need to apply. Typically you will need to apply 1-2 coats. Make sure you wait for the first coat to dry completely before adding a second coat. If you are painting solid pine moulding or unprimed finger joint moulding, we recommend priming with a high quality primer.
How to Paint Your Moulding Before Install
We recommend painting the moulding before it is installed if possible. If you’ve already installed your moulding before painting, go to the next section.
Step 1: Start by lightly sanding the moulding with a sanding sponge or paper.
We recommend using 220-grit sandpaper. Even if you already sanded your moulding while priming it, this step is still necessary.
Step 2: Vacuum the moulding.
This helps remove the debris from sanding.
Step 3: Wipe down the moulding with a clean, slightly damp rag.
Step 4: Apply your paint.
Apply your top coats of paint and refer to the instructions on your paint for how many coats you need to apply. Typically you should apply two coats and wait for the first coat to dry completely before applying the second coat.
Step 5: Install your moulding and caulk your seams.
Caulking your seams gives your moulding a finished look and will cover up any leftover gaps. When applying caulking try to use consistent pressure. We recommend cutting your caulking tube tip at a 30-degree angle, as this will allow for better application.
How to Paint Your Moulding After Install
If you installed your moulding before painting, don’t fret! Follow these steps to paint your moulding after install.
Step 1: Fill any nail holes and repair scratches, dents or damaged surfaces.
You can do this by using a non-shrinking filler such as caulking. Allow the filler to dry and then lightly sand the moulding. We recommend using 220-grit sandpaper. Even if you already sanded your moulding while priming it, this step is still necessary.
Step 2: Vacuum the moulding if possible.
This helps remove the debris from sanding.
Step 3: Caulk your seams.
Caulking your seams gives your moulding a finished look and will cover up any leftover gaps. When applying caulking try to use consistent pressure. We recommend cutting your caulking tube tip at a 30-degree angle, as this will allow for better application.
Step 4: Prepare for painting.
Once the caulking is dry, use painters tape to cover the areas where you do not want to apply paint. Be sure to apply pressure to the tape so the paint doesn’t leak underneath your tape lines.
Step 5: Apply your paint.
Apply your top coats of paint and refer to the instructions on your paint can for how many coats you need to apply. Typically you should apply two coats and wait for the first coat to dry completely before applying the second coat.
Pro tip: Remember to remove the painters tape immediately after finishing to prevent the tape from damaging the wall or surrounding trim.
Helpful Tips
Choosing a Brush or Roller
When painting, a quality brush will yield better results. Don’t go cheap on the paintbrush, as bristles may fall out onto your moulding. We suggest a nylon or poly-nylon brush that is 2 to 2.5 inches in size, as these are best suited for painting trim and mouldings.
How to Sand Your Moulding
Using fine grit sandpaper or a sanding sponge, sand the moulding with the grain of the wood. Coarser grits of sandpaper or sanding against the grain of the wood will leave blemishes in the wood. A very light touch is required when sanding moulding. It is recommended that you sand between each coat of primer or paint. The light sanding will ensure a strong bond between the coats and give a smoother finish.
Finishing Recommendation
Did you find this guide helpful?
For moulding color inspiration, check out our Color Moulding Pinterest Board!
If you don’t have time to prime or paint your moulding, check out our Finished Elegance line of moulding, which requires no painting and comes ready to install!
Show us your beautiful painted mouldings on Instagram, Pinterest and Facebook! @WeAreWoodgrain